Have you ever ohhed and ahhed over the beautiful pre-made flowers the craft stores sell - you know the kind that I mean - the 3 in a package for $5 ones? I usually grimace and walk on by. Hence, you don't often see flower embellishments on my cards. Handmade embellished flowers are all the rage now so I thought I would give it a shot with this tutorial. Unless I saw these in my dreams somewhere, I created this flower "recipe" myself using some basic punches you are already likely to have in your craft room.
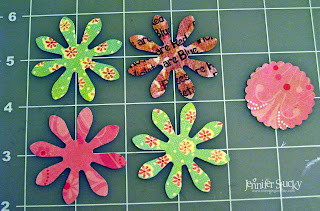
To start, all you need are the supplies above.
Supply List:
Marvy - 2 inch flower punch (or similiar), 1 1/2 inch scalloped circle punch
(or even a plain circle punch will do)
Designer Papers (your choice)
Glue
Dimensionals
Decorating chalk
Colored twine
Wood buttons (or whatever you have)
Ok - so now let's get punching!
To start punch out four flowers and one circle.
I like to incorporate some words on my flowers. I used the True Love Set - "Roses are Red" sentiment by CCS for just this purpose. Inked it up with some SU - Chocolate Chip and stamped my paper before punching.
Next, take the scalloped circle and using a scissors
cut around the center to form a rim like so -
Now to get some lovely dimension - place your word flower on the bottom
and then a colored paper flower on top -
and then a colored paper flower on top -
so that it does not cover the petals of the word flower.
Gently bring the word petals up between the other flower petals and set your scalloped ring over the top and anchor with the word petals by very carefully pulling the word petals tight up against the rim.
Your flower should now be in one neat piece.
Gently bring the word petals up between the other flower petals and set your scalloped ring over the top and anchor with the word petals by very carefully pulling the word petals tight up against the rim.
Your flower should now be in one neat piece.
Place your 3 dimensional flower on top of a flower that matches your scalloped ring (again so that your bottom flowers petals show) - adhering it with a dimensional.
Ok - we are on the home stretch.
This is your last flower punch - dab the center with clear glue and gently place the scalloped flower on top.
Next I took some wood buttons, chalked them up with some soft pink on the edges, threaded some twine and popped it in the center of my flower.
These flowers came together so easily and inexpensively!
Here is what I did with some I made
Even used another Creative Clear Stamp to decorate my gift bag.
These funky circles are from the Friendship set. Aren't they fun?!
I love the variety within each stamp set -
not to mention the oh so reasonable price :)
Whew - my first ever tutorial is complete!
If you have any questions please let me know!
Hugs,


How cool is that! I have got to try this for sure! Great tutorial!
ReplyDeleteAH! LOVE LOVE LOVE these flowers! Great job on the tutorial Jenny!
ReplyDeleteWow! Love these flowers -- look just like the ones that cost mega bucks!! I'll surely give it a try!
ReplyDeleteReally pretty....I love these will have to give this a try....thank you for the great tutorial......
ReplyDeleteLove those flowers and what a great tutorial! Definitely giving this a try and thanks for sharing :o)
ReplyDeletejen awesome tutorial.. pretty card and what pretty flowers! a beautiful way to save a few bucks :)
ReplyDelete